
Date: 2024-10-18 || Views: 715
How to Configure pawaPay SDK: Step-by-step Instructions for Configuration
The pawaPay SDK allows seamless integration of mobile money payments into your PHP applications. Once you have installed the SDK, the next step is configuring it correctly to start processing transactions. This guide provides step-by-step instructions for configuring the pawaPay SDK.
Step 1: Install the pawaPay SDK
Before configuring the SDK, ensure that it is installed. If you haven't already installed it, you can use Composer to add it to your project. Check out the complete guide on Getting Started with the pawaPay SDK: Installation and Setup.
composer require katorymnd/pawa-pay-integration
This will download the SDK and its dependencies into your project's vendor directory.
Step 2: Set Up API Credentials
pawaPay requires an API key to interact with its services. You should obtain this key from the pawaPay dashboard once your account is created.
- Locate Your API Key: Log in to your pawaPay account find your API key under System Configuration > API Tokens and create one. or check the Manage section.
- Store the API Key: Store and update your API key securely in an environment variable
.envfile.# .env PAWAPAY_SANDBOX_API_TOKEN=your_sandbox_api_token_here PAWAPAY_PRODUCTION_API_TOKEN=your_production_api_token_here
You should also protect the .env file - create a .htaccess file and add this code
<Files .env>
    Require all denied
</Files>
Important: The security instructions provided above for the .env file using .htaccess is applicable if you are using an Apache web server. If you're using another server like Nginx, you should ensure that your .env file is not accessible to the public differently, such as configuring `nginx.conf` to deny access to the file or setting file permissions appropriately.
Step 3: Initialize the pawaPay Logic
To start using the SDK, you need to first retrieve what countries are assigned to your account - for this, I advise using a production API token key. Then locate and copy the contents for this page example/fetch_mno_conf.php to the location of your project and then load the page in the browser. This file will load your MNO Availability and Active Configuration via the API and save the details. Also, copy the data folder, mno-img folder, and logs folder.
The entire SDK will rely on this configuration to process transactions. Then update your fetch_mno_conf.php page code blocks
// Load environment variables

$dotenv = Dotenv::createImmutable(__DIR__ . '/../path-to-env');

$dotenv->load();


// Set the environment and SSL verification based on the production status

$environment = getenv('ENVIRONMENT') ?: 'production'; // updated to production

$sslVerify = $environment === 'production';  // SSL verification true in production


// Dynamically construct the API token key

$apiTokenKey = 'PAWAPAY_' . strtoupper($environment) . '_API_TOKEN';


// Get the API token based on the environment

$apiToken = $_ENV[$apiTokenKey] ?? null;
Also, update
$mnoJsonFilePath = __DIR__ . '/../path-to/data/mno_availability.json';
path and
// Ensure that the data directory exists

        if (!file_exists(__DIR__ . '/../path-to/data')) {

            mkdir(__DIR__ . '/../path-to/data', 0755, true);

        }
and also this path
$activeConfJsonFilePath = __DIR__ . '/../path-to/data/active_conf.json';
I think that's all - then load the page in the browser and see what your assigned configurations are. Then check this folder data/ and see if everything is populated okay.
Step 4: Initialize the pawaPay Client
To start using the SDK, you need to create an instance of the ApiClient class and pass your API token. Here's how to do it:
use Katorymnd\PawaPayIntegration\Api\ApiClient;

use Katorymnd\PawaPayIntegration\Utils\Helpers;

use Katorymnd\PawaPayIntegration\Utils\Validator;

// Create a new instance of the API client with SSL verification control

$pawaPayClient = new ApiClient($apiToken, $environment, $sslVerify);
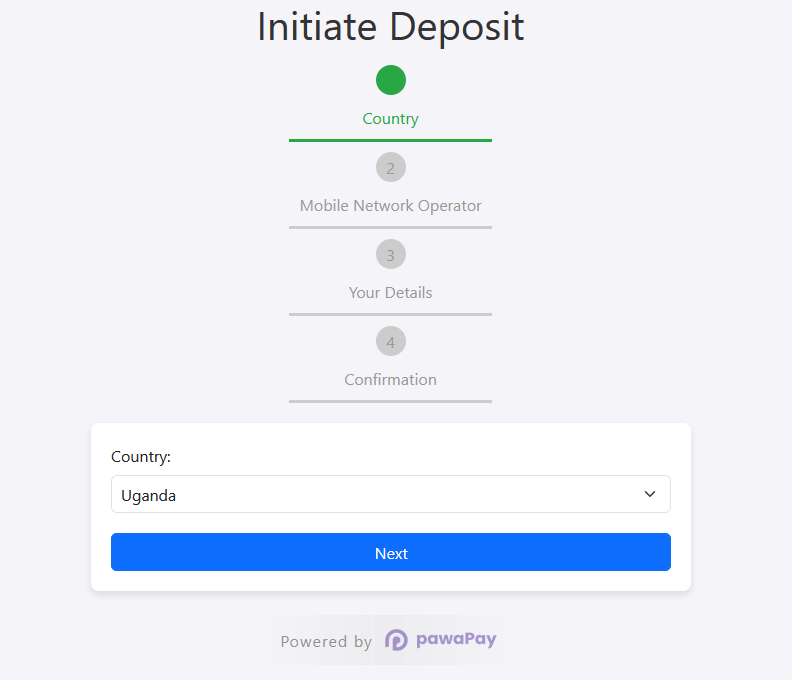
Step 5: Set Environment (Sandbox or Production)
pawaPay allows you to test your integration in a sandbox environment before going live. Set the environment to sandbox or production accordingly
// Set the environment and SSL verification based on the production status

$environment = getenv('ENVIRONMENT') ?: 'sandbox'; // Default to sandbox if not specified
Step 6: Configuring Transaction Details
When initiating a payment, you need to pass several required fields, such as the unique ID, amount, currency, recipient phone number, and Correspondent ID. The metadata is optional
Here's an example configuration for initiating a payment (deposit):
// Prepare request details
// Generate a unique deposit ID using a helper method (UUID v4)

$depositId = Helpers::generateUniqueId();


$amount = '5000'; // Amount in UGX or another currency (should be validated)

$currency = 'UGX'; // Currency code

$correspondent = 'MTN_MOMO_UGA'; // Correspondent ID (MTN Uganda)

$payerMsisdn = '256783456789'; // Payer's phone number


// Custom statement description (should be validated)

$customDescription = 'Payment for order'; // update this desc


// Check if metadata is defined, otherwise default to an empty array

$metadata = isset($metadata) ? $metadata : [];
This data will be passed to the pawaPay SDK when initiating the transaction.
Step 7: Initiating a Payment
Once you have configured the necessary transaction details, you can initiate a payment using the initiateDeposit method:
 //  If all valid, initiate the deposit, including metadata (only if provided)

    $response = $pawaPayClient->initiateDeposit($depositId, $validatedAmount, $currency, $correspondent, $payerMsisdn, $customDescription, $metadata);

 // Check the response status

    if ($response['status'] === 200) {

        echo "Deposit initiated successfully!\n";

        print_r($response['response']);


        // Log success

        $log->info('Deposit initiated successfully', [

            'depositId' => $depositId,

            'response' => $response['response']

        ]);

    } else {

        echo "Error: Unable to initiate deposit.\n";

        print_r($response);


        // Log failure

        $log->error('Deposit initiation failed', [

            'depositId' => $depositId,

            'response' => $response

        ]);

    }
This code sends the payment request to pawaPay, and the response will tell you whether the transaction was successful or if there were errors.
Step 8: Handling API Responses
pawaPay's SDK provides a consistent response structure, making it easy to handle the results of your API calls. To keep track of these responses, logs are stored in a dedicated folder for monitoring transactions.
First, set up logging using Monolog:
$log = new Logger('pawaPayLogger');

$log->pushHandler(new StreamHandler(__DIR__ . '/../path-to/logs/payment_success.log', \Monolog\Level::Info));

$log->pushHandler(new StreamHandler(__DIR__ . '/../path-to/logs/payment_failed.log', \Monolog\Level::Error));
These log files will store detailed information about each transaction, helping you track the status of payments.
Handling Success and Failure Responses
- Success: Check if the response status is
200to confirm a successful transaction. - Failure: If the status is not
200, log the error for debugging.
Here’s an example of how to handle API responses:
// Check the response status
if ($response['status'] === 200) {
    echo "Deposit initiated successfully!\n";
    print_r($response['response']);

    // Log success
    $log->info('Deposit initiated successfully', [
        'depositId' => $depositId,
        'response' => $response['response']
    ]);
} else {
    echo "Error: Unable to initiate deposit.\n";
    print_r($response);

    // Log failure
    $log->error('Deposit initiation failed', [
        'depositId' => $depositId,
        'response' => $response
    ]);
}
- On Success: The code verifies if the response status is
200, indicating the deposit was successfully initiated. The response is then printed and logged. - On Failure: If the status is not
200, the error message is displayed, and the failed transaction is logged for further investigation.
Step 9: Logging and Debugging
To help with debugging and tracking payments, all responses and errors from the pawaPay API are stored in the logs folder. This allows you to monitor API interactions and quickly troubleshoot any issues that arise during payment processing.
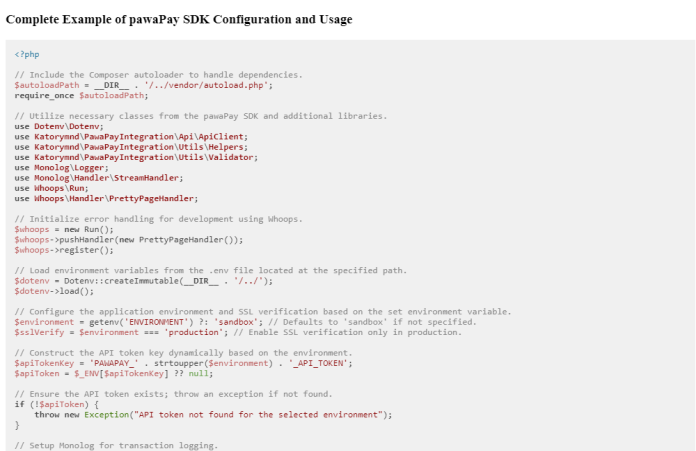
Complete Example of pawaPay SDK Configuration and Usage
<?php

// Include the Composer autoloader to handle dependencies.
$autoloadPath = __DIR__ . '/../vendor/autoload.php';
require_once $autoloadPath;

// Utilize necessary classes from the pawaPay SDK and additional libraries.
use Dotenv\Dotenv;
use Katorymnd\PawaPayIntegration\Api\ApiClient;
use Katorymnd\PawaPayIntegration\Utils\Helpers;
use Katorymnd\PawaPayIntegration\Utils\Validator;
use Monolog\Logger;
use Monolog\Handler\StreamHandler;
use Whoops\Run;
use Whoops\Handler\PrettyPageHandler;

// Initialize error handling for development using Whoops.
$whoops = new Run();
$whoops->pushHandler(new PrettyPageHandler());
$whoops->register();

// Load environment variables from the .env file located at the specified path.
$dotenv = Dotenv::createImmutable(__DIR__ . '/../');
$dotenv->load();

// Configure the application environment and SSL verification based on the set environment variable.
$environment = getenv('ENVIRONMENT') ?: 'sandbox'; // Defaults to 'sandbox' if not specified.
$sslVerify = $environment === 'production'; // Enable SSL verification only in production.

// Construct the API token key dynamically based on the environment.
$apiTokenKey = 'PAWAPAY_' . strtoupper($environment) . '_API_TOKEN';
$apiToken = $_ENV[$apiTokenKey] ?? null;

// Ensure the API token exists; throw an exception if not found.
if (!$apiToken) {
    throw new Exception("API token not found for the selected environment");
}

// Setup Monolog for transaction logging.
$log = new Logger('pawaPayLogger');
$log->pushHandler(new StreamHandler(__DIR__ . '/../logs/payment_success.log', \Monolog\Level::Info));
$log->pushHandler(new StreamHandler(__DIR__ . '/../logs/payment_failed.log',\Monolog\Level::Error));

// Initialize the pawaPay API client with SSL verification settings.
$pawaPayClient = new ApiClient($apiToken, $environment, $sslVerify);

// Generate a unique ID for the transaction.
$depositId = Helpers::generateUniqueId();

// Setup transaction details.
$amount = '5000'; // Specify the transaction amount, should be validated.
$currency = 'UGX'; // Set the transaction currency.
$correspondent = 'MTN_MOMO_UGA'; // Define the mobile money service provider.
$payerMsisdn = '256783456789'; // Payer's mobile number.
$customDescription = 'Payment for order'; // Description of the transaction.

// Optional metadata can be used to provide additional transaction details.
$metadata = [
    // Add metadata items as needed.
];

// Handle transaction validation and initiation.
try {
    // Validate the transaction amount.
    $validatedAmount = Validator::symfonyValidateAmount($amount); // Validate amount using a custom method.

    // Validate the statement description.
    $validatedDescription = Validator::validateStatementDescription($customDescription);

    // Validate metadata count if metadata is provided.
    if (!empty($metadata)) {
        Validator::validateMetadataItemCount($metadata);
    }

    // Initiate the deposit with validated data.
    $response = $pawaPayClient->initiateDeposit($depositId, $validatedAmount, $currency, $correspondent, $payerMsisdn, $validatedDescription, $metadata);

    // Check the response status and handle accordingly.
    if ($response['status'] === 200) {
        echo "Deposit initiated successfully!\n";
        print_r($response['response']);
        $log->info('Deposit initiated successfully', [
            'depositId' => $depositId,
            'response' => $response['response']
        ]);
    } else {
        echo "Error: Unable to initiate deposit.\n";
        print_r($response);
        $log->error('Deposit initiation failed', [
            'depositId' => $depositId,
            'response' => $response
        ]);
    }
} catch (Exception $e) {
    // Handle and log any errors encountered during the process.
    echo "Validation Error: " . $e->getMessage() . "\n";
    $log->error('Validation error occurred', [
        'depositId' => $depositId,
        'error' => $e->getMessage()
    ]);
}
?>
The example script provided demonstrates the full process of configuring and using the pawaPay SDK in a PHP application, aligning with the guide's steps. It includes:
- Setup: Incorporating dependencies, initializing error handling, and loading environmental variables.
- Configuration: Setting the application environment, SSL verification, and retrieving API tokens.
- Logging: Configuring logging for monitoring and debugging.
- Transaction Handling: Generating transaction IDs, setting transaction details, and optionally including metadata.
- Validation and Execution: Validating transaction inputs and executing the payment process, including error handling.
- Usage Tips: The script serves as a customizable template for integrating pawaPay into various project environments.
Conclusion
Configuring the pawaPay SDK is a straightforward process that involves setting up your API key, configuring transaction details, and handling responses. By following the steps outlined in this guide, you can easily integrate mobile money payments into your application and begin processing transactions with pawaPay. Be sure to test your integration in the sandbox environment before switching to live mode for real payments.

Discover how Katorymnd Freelancer's web design transforms Ugandan businesses, highlighting...

Elevate your WordPress site with the Katorymnd Reaction Plugin. Engage...

Explore advanced features of the Pesapal PHP SDK: recurring payments,...
Katorymnd Portfolio
Here is how I helped my clients reach their goals. Click on the portfolio websites.
Fishman's Fresh Fish Delivery

A custom-built PHP website for online fresh tilapia home delivery.

Online interracial local singles dating site.

Drupal website built for online dating.
Remote File Sync - VS Code Extension
A VS Code extension to manage and synchronize your remote and local files efficiently, supporting FTP, SFTP, SSH, WebDAV, and Google Drive connections.
Katorymnd Reaction Process - WordPress Plugin
A WordPress plugin that introduces a dynamic and interactive layer to your site, allowing users to express their feelings and thoughts on your content through a variety of reaction options.
pawaPay SDK - Payment Integration
The pawaPay SDK provides seamless mobile money integration into your PHP applications, enabling smooth transaction processing with powerful API features.
Pesapal SDK - Payment Gateway Integration

A robust PHP SDK for integrating with Pesapal's payment gateway, providing seamless transaction handling for card payments
Get started now
© Copyright 2025 - Katorymnd Web Solutions - All Rights Reserved. Registered with Uganda Registration Services Bureau.