
Date: 2024-08-20 || Views: 700
How to Configure FTP, SFTP, SSH, and WebDAV in Remote File Sync
Remote File Sync for Visual Studio Code is a powerful tool that supports various protocols, allowing seamless synchronization between your local environment and remote servers or cloud storage. Let's provide detailed instructions on how to set up and configure each of the supported protocols: FTP, SFTP, SSH, and WebDAV.
Configuring FTP
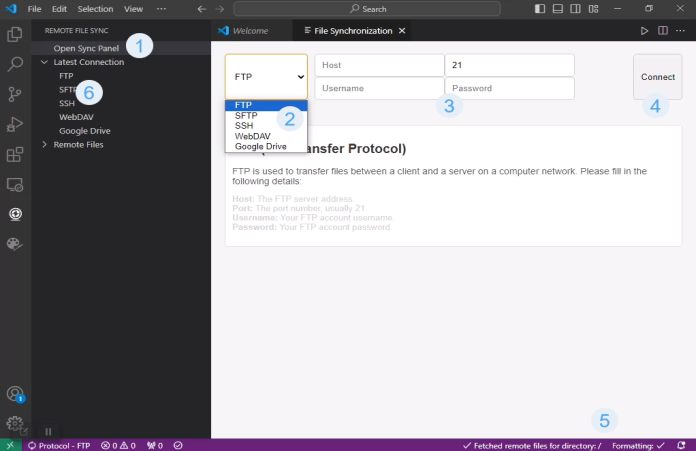
Step 1: Open Sync Panel
Launch Visual Studio Code and click on the "Remote File Sync." icon.
Step 2: Add a New Connection
Click on "Open Sync Panel" and the "File Synchronization" window will open.
Step 3: Choose FTP Protocol
Select "FTP" as the protocol for your connection. Provide the required information, such as the FTP server address, port number (usually 21), username, and password.
Step 4: Enter Connection Details
Click the "Connect" button after ensuring the details are correct, the system will connect to the FTP server.
Step 5: The Connection
A success message will confirm the connection, and your details will be saved locally.
Step 6: Connect and Sync
Once verified and saved, to connect click on "Latest Connection". Once a success message is displayed, click on `Remote Files" to sync files between your local directory and the FTP server.
Configuring SFTP
Step 1: Open Sync Panel
Launch Visual Studio Code and click on the "Remote File Sync." icon
Step 2: Add a New Connection
Click on "Open Sync Panel," and the "File Synchronization" window will open.
Step 3: Choose SFTP Protocol
Select "SFTP" as the protocol for your connection. Provide the SFTP server address, port number (usually 22), username, and password.
Step 4: Enter SSH Key (if applicable)
If using an SSH key for authentication, specify the path to your private key.
Step 5: The Connection
Click the "Connect" button. A success message will confirm the connection, and your details will be saved locally.
Step 6: Connect and Sync
Once verified and saved, click on "Latest Connection." When a success message is displayed, click on "Remote Files" to sync files between your local directory and the SFTP server.
Configuring SSH
Step 1: Open Sync Panel
Launch Visual Studio Code and click on the "Remote File Sync." icon
Step 2: Add a New Connection
Click on "Open Sync Panel," and the "File Synchronization" window will open.
Step 3: Choose SSH Protocol
Select "SSH" as the protocol for your connection. Provide the SSH server address, port number (usually 22), username, and password.
Step 4: Enter SSH Key
Specify the path to your SSH private key for authentication.
Step 5: The Connection
Click the "Connect" button. A success message will confirm the connection, and your details will be saved locally.
Step 6: Connect and Sync
Once verified and saved, click on "Latest Connection." When a success message is displayed, click on "Remote Files" to sync files between your local directory and the SSH server.
Configuring WebDAV
Step 1: Open Sync Panel
Launch Visual Studio Code and click on the "Remote File Sync." icon
Step 2: Add a New Connection
Click on "Open Sync Panel," and the "File Synchronization" window will open.
Step 3: Choose WebDAV Protocol
Select "WebDAV" as the protocol for your connection. Provide the WebDAV server URL, username, and password.
Step 4: The Connection
Click the "Connect" button. A success message will confirm the connection, and your details will be saved locally.
Step 5: Connect and Sync
Once verified and saved, click on "Latest Connection." When a success message is displayed, click on "Remote Files" to sync files between your local machine and the WebDAV server.
Conclusion
Configuring different protocols in Remote File Sync is straightforward, offering flexibility in how you manage and synchronize your files. Whether you're using FTP, SFTP, SSH, or WebDAV, these detailed instructions should help you set up your connections quickly and efficiently. If you encounter any issues or need further assistance, consult the official documentation or reach out to our support team. Happy syncing!

Explore our guide on creating professional websites for healthcare pros,...

Discover how the metaverse is transforming freelance work with virtual...

Discover how AI is revolutionizing web development, from automated coding...
Katorymnd Portfolio
Here is how I helped my clients reach their goals. Click on the portfolio websites.
Fishman's Fresh Fish Delivery

A custom-built PHP website for online fresh tilapia home delivery.

Online interracial local singles dating site.

Drupal website built for online dating.
Remote File Sync - VS Code Extension
A VS Code extension to manage and synchronize your remote and local files efficiently, supporting FTP, SFTP, SSH, WebDAV, and Google Drive connections.
Katorymnd Reaction Process - WordPress Plugin
A WordPress plugin that introduces a dynamic and interactive layer to your site, allowing users to express their feelings and thoughts on your content through a variety of reaction options.
pawaPay SDK - Payment Integration
The pawaPay SDK provides seamless mobile money integration into your PHP applications, enabling smooth transaction processing with powerful API features.
Pesapal SDK - Payment Gateway Integration

A robust PHP SDK for integrating with Pesapal's payment gateway, providing seamless transaction handling for card payments
Get started now
© Copyright 2025 - Katorymnd Web Solutions - All Rights Reserved. Registered with Uganda Registration Services Bureau.